Why another image viewer?
I open a lot of images daily as part of my workflow just to inspect them. And I don’t just want to view the pixel contents of the image or zoom into it, I also want to check the alpha channel, or see how a mask texture is packed. I also want to view the contents of the image or channel against different background colors or a checkerboard pattern for images with transparency or alpha channels. These are operations common image viewers don’t offer.
Photoshop can do all of this, but that is a full-fledged image editor - it takes time to start, open the file and switch to the view I need. Unity has a texture viewer, but it shows individual channels using colored overlays. For texture work I need to see the texture channels directly as a greyscale image.
For me the biggest issue isn’t the missing features of existing image viewers but the interruption in workflow opening images in them creates. A simple image inspection should be quick enough that it doesn’t break the flow of work, but it keeps becoming a context switch. This is why I decided to build Fire (the name stands for Fast Image REview) - an image viewer that is fast and designed for game development workflows. To be clear - it is strictly an image viewer, and it does not try to replace Photoshop or any other image editing application. Its job is to open an image file as quickly as possible, and have quick controls to show the image in the way I want.
Disclaimer: Fire has been built with the help of AI tools, but this isn’t just another vibe coded project. I designed the architecture, tested the implementation, profiled the application at every step, and worked to keep UX as painless as possible. This post covers the process, parts that worked and parts that didn’t.
The most important part of the design is startup time. When an image is opened from File Explorer the application has to start, decode the image, upload it to the GPU as a texture, and draw it. The time it takes between the launch of the application process and it presenting the image on the screen - time to first pixel - is the main performance metric for the application. Every single decision during development was made to optimize the time to the first pixel - make opening an image feel as close to immediate as possible.
1st pass: wgpu + winit + egui
I built the first version of Fire with wgpu + winit + egui as it was something I had already used in a different project. It worked, but it didn’t feel fast enough, and the resource usage was higher than what I had expected. This is most likely because of the DX12 backend that wgpu uses, as DX12 just takes longer to initialize a window (there’s a Vulkan backend also available for wgpu on Windows, but it profiled similarly for startup time). As for resource usage, I’m comparing with the excellent XnView Classic, as it is super lean on resource usage and opens up relatively quickly.
| Image asset | XnView Classic RAM usage | Fire RAM usage |
|---|---|---|
| 4096 x 4096 27 MB PNG | 69.2 MB | 173.5 MB |
| 8192 x 4096 58 MB PNG | 103.7 MB | 210.3 MB |
Fire was using 2x the amount of RAM for showing the same texture, and I think it should launch faster.
2nd pass: CPU only renderer, Win32 GDI for UI
I decided to try the same approach as XnView Classic - CPU only renderer, Win32 GDI for UI.
| Image asset | XnView Classic RAM usage | Fire RAM usage |
|---|---|---|
| 4096 x 4096 27 MB PNG | 69.2 MB | 70.2 MB |
| 8192 x 4096 58 MB PNG | 103.7 MB | 104.4 MB |
Quick point here: I did end up using custom styling for the Win32 GDI as it officially doesn’t support dark mode, and an image viewer needs to have dark chrome. This seemed all good, till I tried to zoom and pan around the image quickly - it felt very choppy and there was obvious screen tearing. On top of that, CPU usage shot up noticeably when panning or zooming the window. It needs to be on the GPU - the app needs to be responsive when interacting with the image.
3rd pass: DX11 renderer, Win32 GDI for UI
Here I replaced the CPU renderer with a DX11 one, and it fixed all of the stuttering and screen tearing issues. RAM usage was a bit higher than XnView here, but not by much - and the viewport was fully responsive and smooth when zooming and panning around or resizing the application window.
| Image asset | XnView Classic RAM usage | Fire RAM usage |
|---|---|---|
| 4096 x 4096 27 MB PNG | 69.2 MB | 77.1 MB |
| 8192 x 4096 58 MB PNG | 103.7 MB | 115.3 MB |
At this point I was happy enough with the core application performance, next part was choosing image decoders.
Choosing decoders for image formats
Fire uses multiple image decoders to support all major image formats as there’s no single decoder that supports all formats and is the fastest for all formats as well. For formats that have multiple decoders available I benchmarked the image decoders to find out the fastest for that format. zune-image handles decoding most of the image formats, and that’s the one I started with. Here’s a list of decoders that Fire currently uses:
| Format | Decoder Fire routes to | Notes |
|---|---|---|
| JPG | zune-image |
zune-jpeg 0.5.15, DecoderOptions::new_fast (SIMD + unsafe fast paths) |
| PNG | image crate |
png 0.18 + fdeflate |
| BMP | zune-image |
zune-bmp |
| WebP | zune-image |
image-webp (zune re-exports it) |
| Radiance HDR (.hdr/.pic) | image crate |
image::codecs::hdr::HdrDecoder, non-strict mode -> RGBA32F |
| GIF | image crate, dedicated multi-frame path |
|
| TIFF | tiff crate 0.11 driven directly |
own module tiff.rs, falls back to image for palette/CMYK/YCbCr/Lab |
| TGA | image crate |
|
| OpenEXR | exr crate |
32 bit float RGBA |
| PSD / PSB | psd_sdk (Molecular Matters, C++) over FFI |
psd library SDK |
| AVIF / HEIC / HEIF | libheif + dav1d + libde265 |
|
| Camera RAW formats | custom preview extractor (raw.rs) -> zune-jpeg |
not decoded, largest embedded JPEG preview is located and decoded |
PNG: the png+fdeflate stack measured ~1.8× faster than zune-png end-to-end
(~190 ms vs ~340 ms on an 8192×4096 texture).
HDR: image crate was similarly ~2x faster than zune-hdr.
TIFF is driven against the tiff crate directly rather than through image,
because image collapses anything that tiff’s conservative colortype() doesn’t
name: it dropped Photoshop’s unlabelled 4th sample (ExtraSamples = 0), refused
grey+alpha outright, and narrowed 16-bit to 8.
For Camera RAW formats Fire just reads the largest embedded JPEG preview, as supporting all possible RAW formats from all camera vendors is out of scope for an image viewer made for game development workflows.
Switching from Win32 GDI to ImGui
Fire’s UI was hand-painted GDI, all of it. Not “we used a few common controls” - I
mean every pixel of the toolbar, the status bar, the flipbook transport, the
tooltips, and a full settings dialog was FillRect and DrawTextW calls, with
hand-rolled hit-testing and hover state behind them. That’s roughly 4,700 lines of
UI, and essentially all of it was reimplementing widgets that have been solved
since 1995. I wanted something that was simpler to maintain.
Also, Fire had two windows, because GDI can’t paint on a flip-model swapchain. One cannot mix GDI painting with a flip-model swapchain, so the app had a parent window (GDI chrome) and a child window (the DX11 viewport).
Since the majority of the application is just a DX11 viewport, I naturally tried using Dear ImGui as it is super easy to integrate for simple interfaces like the kind Fire uses. When benchmarked I got some interesting numbers - ImGui was faster than Win32 GDI implementation despite being an immediate mode framework.
After twenty runs per build, on a 38 KB PNG and an 8.9 MB one:
| Build UI | Image size | Median | Mean | vs. GDI |
|---|---|---|---|---|
| GDI | 38 KB | 143.8 ms | 143.8 ms | - |
| ImGui | 38 KB | 141.1 ms | 141.3 ms | −2.7 ms |
| GDI | 8.9 MB | 170.4 ms | 170.2 ms | - |
| ImGui | 8.9 MB | 164.4 ms | 165.0 ms | −6.0 ms |
The old build using Win32 GDI, before it could show a pixel:
- created a second HWND for the viewport, and
- painted the chrome with GDI on the UI thread during startup - creating fonts, blitting icons through device contexts, double-buffering the lot.
ImGui’s context creation and font atlas upload cost less than the window and the GDI paint they replaced. The icons are now a single texture, and the chrome is a handful of triangles on a GPU that was already initialized and idle. Across the whole change: +3,641 / −5,750 - a net deletion of about 2,100 lines of code.
Getting Fire to recognize Sprite Sheets
A lot of game and VFX art ships as sprite sheets or flipbooks - a single image that’s
actually a grid of animation frames laid out left to right, top to bottom. Play the
cells in sequence and you get an explosion, a puff of smoke, a running character.
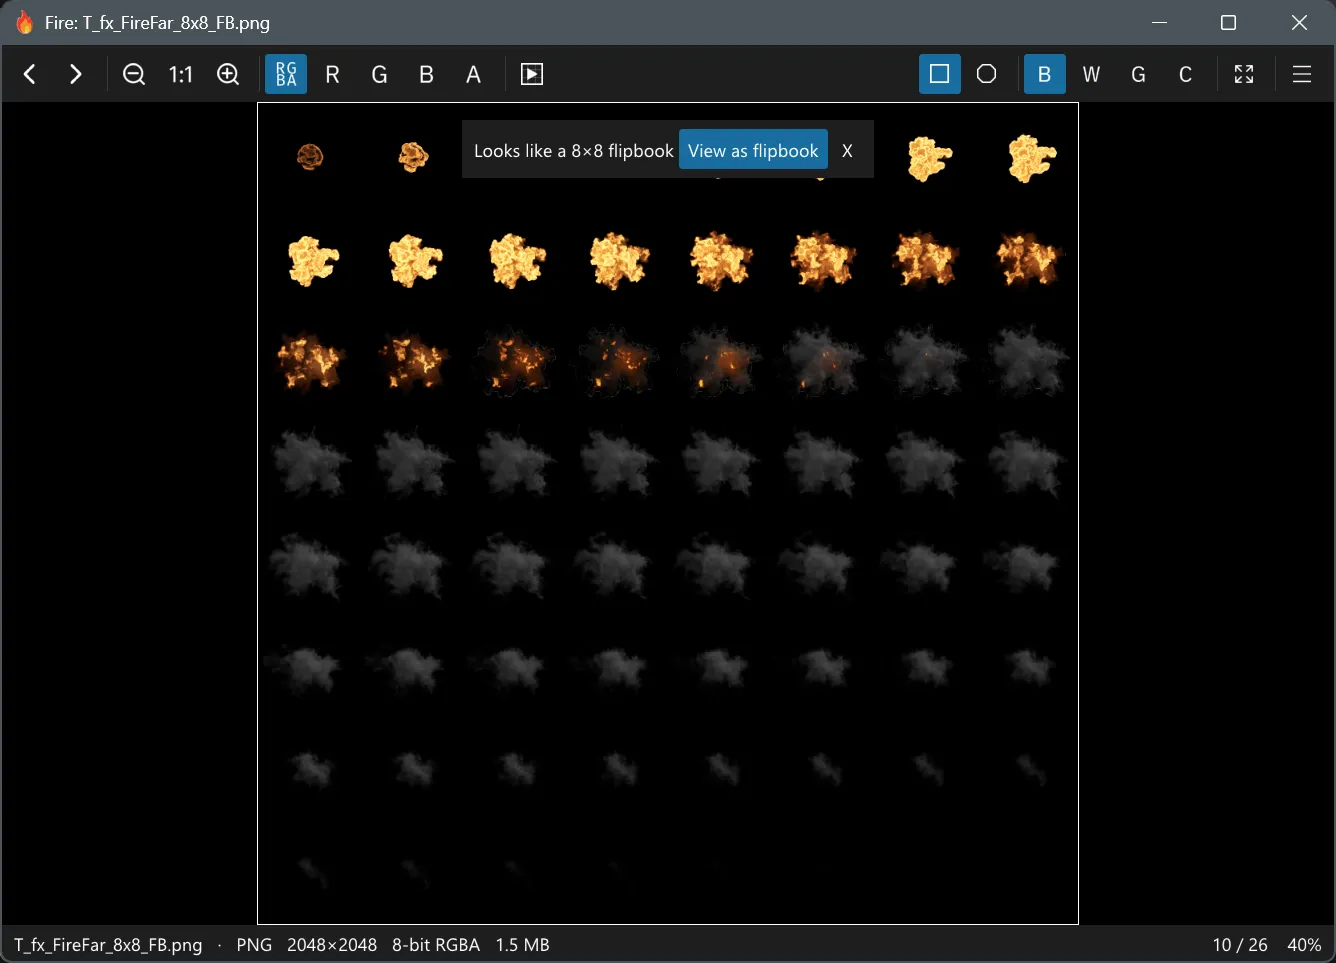
Now this is a tricky problem to fix:
- the grid can be of any size:
2×2,8×8,5×5,6×6, even a single row like4×1. - grid sizes aren’t pixel-perfect: game engines love power-of-two textures, but the
artist might pack a
5×5grid into it. 2048 / 5 = 409.6 - the cells don’t land on whole pixels. - cell content can vary drastically - in a fire animation, frame 0 is a tiny spark and frame 63 is a faint cloud of smoke - they barely look alike.
- lots of images aren’t sprite sheets at all: a single character portrait, a tiling texture, a photo. The detector has to say “no grid here” for those, or it’ll pester the user with wrong guesses.
I tried multiple approaches to detect the grid size:
- Filename as a hint: some files have the grid size in their file name, but it is never reliable as only some files have it, and the name might be incorrect. This can be a prior, but never the final result.
- Shift correlation / boundary anomaly based content analysis: scan candidate grids (divisors of the image size), score each with a mix of “shift-correlation” (does the image look like itself when slid over by one cell?) and “boundary-anomaly” (are there regular seams?), and pick a winner. This fell apart if the grid size of the real image wasn’t an integer.
Instead of reasoning about the algorithm in the abstract, I generated thumbnails of the real sheets and studied them. Here’s what I realized:
- Real flipbooks share a visual pattern: a regular grid of content blobs separated by empty gutters. In a fire sheet, each cell has a flame/smoke blob roughly centered, with blank margins around it. In a running-character sheet, each cell has the character with white space between.
- Non-flipbooks don’t have this:
- A character texture is one continuous object - no repeating cells
- A caustic/water texture is uniform noise everywhere - no gutters
- A single spark sprite is one soft blob filling the frame - nothing repeats
The thing to detect isn’t “self-similarity” or “seams” - it’s periodic gutters. If you collapse the image into a 1-D profile of “how much content activity is in each column” (and each row), a real sprite sheet’s profile is periodic: high over cells, low over gutters. A single object is one broad bump; a uniform texture is flat.
So the problem reduces to a classic one: find the period of a 1-D signal. A bit of Googling revealed that the problem already has a known answer in a different field - pitch detection in audio. Finding the fundamental frequency of a musical note is exactly this problem: find the period of a signal whose amplitude drifts over time. The go-to algorithm is YIN (a cumulative-mean-normalized difference function).
YIN handled this much better, and it also did fractional cell sizes for free: it finds the true period even when it’s 409.6 pixels, so non-power-of-two grids on power-of-two canvases finally worked. Here’s the final pipeline:
- Shrink the image to a small greyscale analysis copy.
- Build a per-column and per-row “content activity” profile.
- Run YIN period detection on each axis to find the cell size (handles fractional cells and amplitude drift).
- If only one axis has a period, treat it as a strip.
- Reject flat profiles (uniform textures), near-perfect tilings (far-similarity almost 1), over-split grids (mostly-empty cells), and strips whose frames don’t resemble each other.
- If the brightness channel finds nothing, retry on the alpha channel.
- If content is still silent, fall back to a
NxMfilename token.
Flipbook detection works reliably now, but a detector that’s accurate and slow would hurt the whole point of Fire, which is optimized for time-to-first-pixel. So Fire decodes images on a pool of background worker threads, never on the UI thread. Detection lives on that same background job - but it is deliberately kept off the path to first pixel. The sequence for opening one image is:
- The window opens immediately with a placeholder - the UI thread is never blocked.
- A background worker decodes the image and posts it straight to the UI for display.
- Only then, on that same worker, does it run flipbook detection on the decoded pixels.
- It posts the detection result back to the UI as a separate, second message.
- The UI shows the image first, the “flipbook detected” hint pops up a beat later.
How long does flipbook detection take?
| Image size | Detection time |
|---|---|
| 64–256 px | 0.02 – 0.6 ms |
| 512 px | 1.5 – 3 ms |
| 1024 px | 3 – 6 ms |
| 2048×2048 | ~3.3 ms, or ~6.5 ms if it also runs the alpha pass |
Across all test files, detection averaged ~3.3 ms. And because it runs after the image is displayed, none of that time is felt as lag - it only defines how soon the hint appears. I also set the detection logic to run on a ≤512 px copy instead of the original full resolution image - there’s no reason to run the detection using every single pixel of a 16K image when a downsampled version also generates the same result. So because of it the detection is always done in less than 3.3 ms (6.5 ms for images with alpha pass).
VFX Octagon overlay
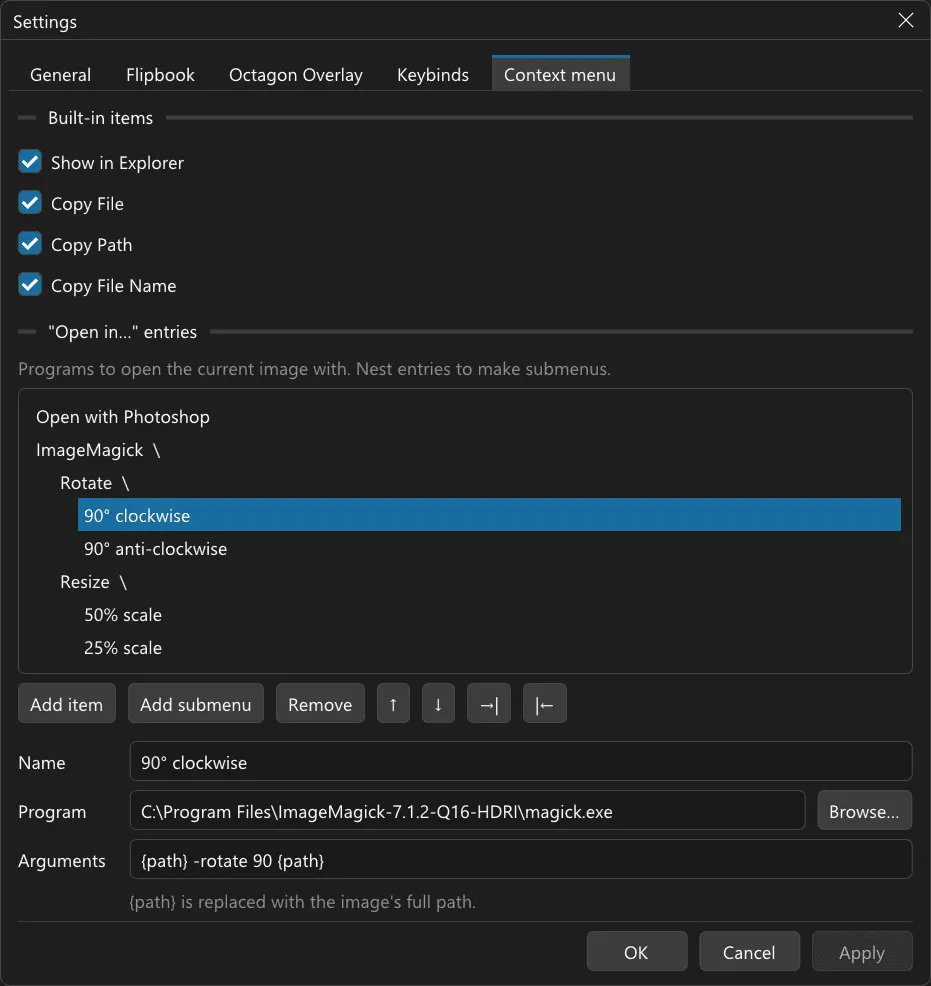
Customizing Fire and extending the context menu
The first thing that I added after basic image viewing was some context menus for
common file operations: show in explorer, copy file / path, etc. For me this was good
enough for an image viewer, but my team members asked for basic image editing options
as well. I didn’t want to do that: making an image editor is a big task, and frankly
out of scope for this tool. So I added context menu options to send the image to
other applications with arguments. The idea is to delegate the editing tasks to
editing tools, and make it convenient and customizable for the user since everyone
will have different editing tasks. Here’s what it looks like in action in the GUI:
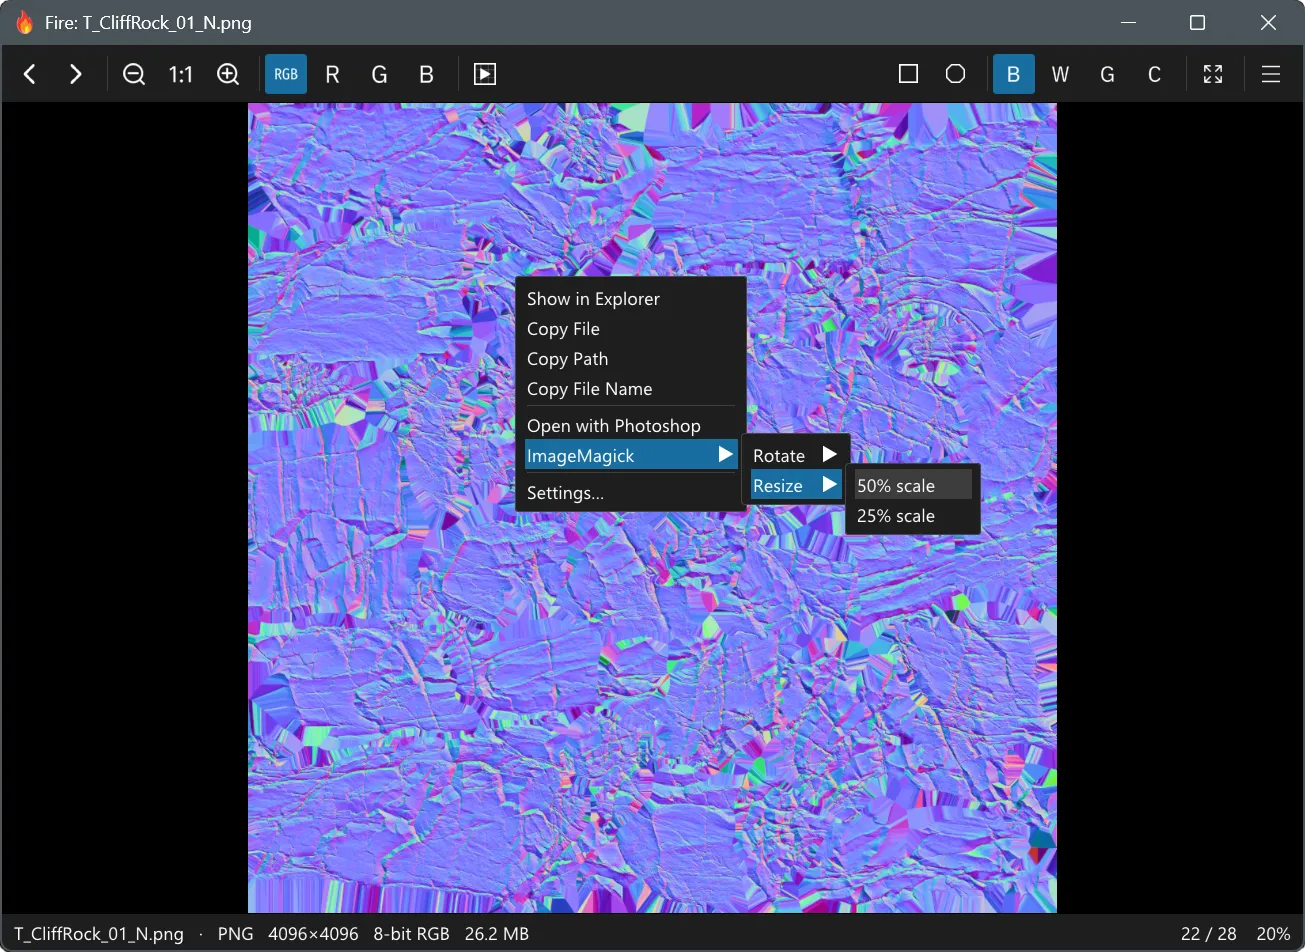
Since Fire hot reloads images as they change on the disk, ImageMagick is a perfect
solution to the quick editing needs. All you have to do is to declare the command and
argument in Fire’s config.toml and it shows up in the context menu. For example,
here’s the config for the context menu as shown in the above image.
[[open-with]]
name = "Open with Photoshop"
path = 'C:\Program Files\Adobe\Adobe Photoshop 2026\Photoshop.exe'
args = ["{path}"]

[[open-with]]
name = "ImageMagick"
  [[open-with.items]]
  name = "Rotate"
    [[open-with.items.items]]
    name = "90° clockwise"
    path = 'C:\Program Files\ImageMagick-7.1.2-Q16-HDRI\magick.exe'
    args = ["{path}", "-rotate", "90", "{path}"]
    [[open-with.items.items]]
    name = "90° anti-clockwise"
    path = 'C:\Program Files\ImageMagick-7.1.2-Q16-HDRI\magick.exe'
    args = ["{path}", "-rotate", "-90", "{path}"]
  [[open-with.items]]
  name = "Resize"
    [[open-with.items.items]]
    name = "50% scale"
    path = 'C:\Program Files\ImageMagick-7.1.2-Q16-HDRI\magick.exe'
    args = ["{path}", "-resize", "50%", "{path}"]
    [[open-with.items.items]]
    name = "25% scale"
    path = 'C:\Program Files\ImageMagick-7.1.2-Q16-HDRI\magick.exe'
    args = ["{path}", "-resize", "25%", "{path}"]
Initially editing the config meant editing the config.toml in user’s AppData
folder, but I ended up making a settings GUI that exposes most of the config options
in a tabbed dialog.
Where to get it
Fire is a free and open-source application for Windows available under the MIT license. You can get the application binaries and source code from its GitHub repository: https://github.com/psmyles/fire